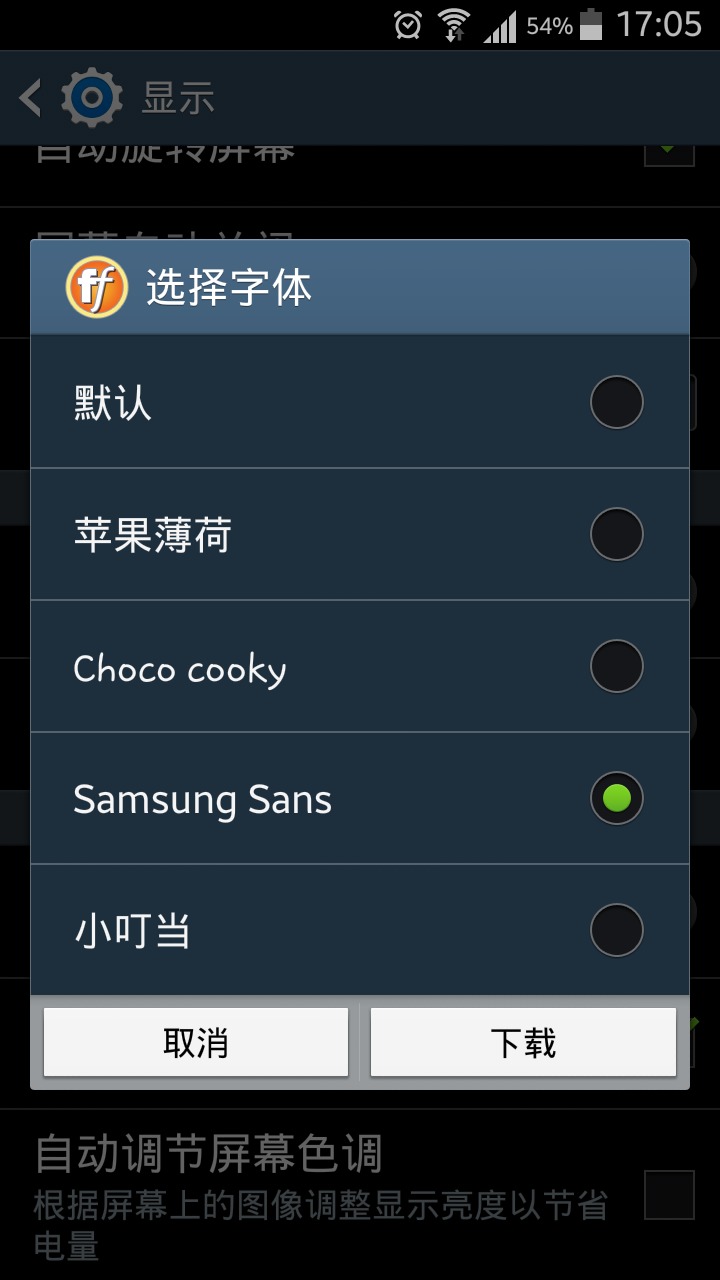
最近在调研一个东西,就是动态切换 android 的系统字体。我的手机是三棒的 Galaxy SIII,系统设置中自带的了这个功能:
既然别人都弄出来了,应该是可行的。于是开始琢磨(这里事先申明下,以下是基于 4.1.2 的源码的)。
初步了解
经过几番百度, Typeface(frameworks/base/graphics/java/android/graphics/Typeface.java) 这个类。这个类有好几个 public static final 的变量:
1
2
3
4
5
6
7
8
9
10
11
12
13
14
15
public static final Typeface DEFAULT;
public static final Typeface DEFAULT_BOLD;
public static final Typeface SANS_SERIF;
public static final Typeface SERIF;
public static final Typeface MONOSPACE;
至于什么是衬线字、无衬线字、等宽字百度吧。然后还有4种样式:
1
2
3
4
5
6
public static final int NORMAL = 0 ;
public static final int BOLD = 1 ;
public static final int ITALIC = 2 ;
public static final int BOLD_ITALIC = 3 ;
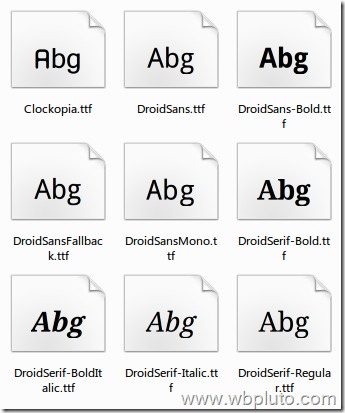
分别是正常、粗体、斜体、粗斜体。默认系统里面是有9个字体文件的:
那个 Fallback 是备用字体。Droid Sans Fallback 包含了东亚字符。当需要显示的字符在 Droid Sans 字体中不存在(如汉字),即没有对应编码的字符时,系统会到 Droid Sans Fallback 中去寻找相应编码的字符,如果找到,则使用 Droid Sans Fallback 字体来显示它,如果仍然找不到该编码对应的字符,则系统无法在屏幕上显示出这个字符。
所以要动态字体能够比较好的适应系统,虽然不一定要覆盖全这9种字体文件,但是至少要有4种会比较好,例如 sans_serif 的 Regular, Bold, Italic, BoldItalic 。这里只是简单的研究下,所以只去找个几个别的字体的 Regular 的。
然后,这些 static 变量都是 static 初始化的:
1
2
3
4
5
6
7
8
9
10
11
12
13
14
15
static {
DEFAULT = create((String) null, 0 );
DEFAULT_BOLD = create((String) null, Typeface.BOLD);
SANS_SERIF = create("sans-serif" , 0 );
SERIF = create("serif" , 0 );
MONOSPACE = create("monospace" , 0 );
sDefaults = new Typeface[] {
DEFAULT,
DEFAULT_BOLD,
create((String) null, Typeface.ITALIC),
create((String) null, Typeface.BOLD_ITALIC),
};
}
这个 create 是通过 jni 去调用 skia 的接口创建 SkTypeface 的。而创建相应的 SkTypeface 是根据系统加载的默认字体来决定的。系统的默认字体文件在 /system/fonts 下,配置也是在这个下面,是 system_fonts.xml 和 fallback_fonts.xml 。
而加载默认字体的代码在:external/skia/src/ports/SkFontHost_android.cpp 里面:
1
2
3
4
5
6
7
8
9
10
11
12
13
14
15
16
17
18
19
20
21
22
23
24
25
26
static void loadSystemFontsLocked() {
#if !defined(SK_BUILD_FOR_ANDROID_NDK)
static char prevLanguage[3 ];
static char prevRegion[3 ];
char language[3 ] = "" ;
char region[3 ] = "" ;
getLocale(language, region);
if (!gDefaultNormal) {
strncpy (prevLanguage, language, 2 );
strncpy (prevRegion, region, 2 );
initSystemFontsLocked();
} else if (strncmp (language, prevLanguage, 2 ) || strncmp (region, prevRegion, 2 )) {
strncpy (prevLanguage, language, 2 );
strncpy (prevRegion, region, 2 );
reloadFallbackFontsLocked();
}
#else
if (!gDefaultNormal) {
initSystemFontsLocked();
reloadFallbackFontsLocked();
}
#endif
}
这里流程我没太仔细研究,因为是初步调研,最关键的是后面没下文了,所以没啥动力了。然后去解析前面那2个 xml 里面的内容,然后加载字体文件。然后上层 java 层的 Typeface 预先创建了几个默认的字形对象(Typeface)。然后应用可以直接引用这几个 static 的变量,也可以通过这几个变量创建出不同的样式(系统默认没创建完所有样式的 Typeface 变量,而且系统也没提供完所有 Typeface 的样式的字体文件,自己数数看,默认、衬线、无衬线、等宽4种类型,每种4种样式,默认字体才9个,还有一个是时钟专用的,就是才8个而已)。
基本思路
有个初步了解后,那么基本思路就出来了。就是在 framework 里面弄一个界面(三棒的是在 Settings 里面的),读取特定路径下的可变化字体。然后替换默认字体,最后让应用更新一下就行了。基本思路虽然简单,其实实践起来有不少问题的。下面慢慢来说。
1.替换默认字体
这点其实挺麻烦,因为系统使用的字体很多。要想完全换完,你得提供配套的可换的字体。这里你自己就得设计一下一套字体的规范了,例如必须要包含 Regular,其它的可选。然后那几种类型必须要有一个。然后这样肯定 ttf 文件不止一个,那么可以认为规定下 ttf 命名规范: 字体-类型.ttf 。例如说: Chococooky-Regular.ttf 然后 UI 选择界面那里就只用出现一个名字: Chococooky 就代表了这一整套字体。然后自己把数据结构设计好,扫描的时候把 Chococooky 开头的都算上,然后根据后面的后缀判断这是什么类型、样式的。
这里可以规定一个目录,可以在 data 分区,专门放自定义可更换的字体。放 data 分区也方便以后在线更新。或者现在很多是把字体打包到 apk 里面了,这也好办,选中某个字体 apk 的时候,把里面的 ttf 复制到 data 分区就好了。不要不复制出 apk ,因为改系统字体,开机要加载的,如果单纯放 apk 里,不太稳定,还是复制到 data 分区的某一个目录比较靠谱。
然后正确的做法,应该是选中了之后,应该根据这套字体 ttf 文件的数量(种类、样式),生成类似 system_fonts 类似的文件,也放到 data 分区这个目录下,然后可以在 SystemProperties 增加一条属性,来记得当前使用的字体情况。这个就可以自由发挥了,例如说:
SystemProperties.get("persist.sys.customfont", "default");
例如取得是 “default” 就去解析默认的 system_fonts.xml ,如果取得是 “custom” 的去解析 data 分区下那个 system_fonts.xml 。然后加载指定的字体。
当然这个得改 skia 里面那个 SkFontHost_android.cpp 里面那几加载字体相关的函数。我前面说了,我这个是粗略的研究,就懒得改 skia ,于是我暂时是把 java 层 Typeface 那几个 static 变量给改了(改 skia,也要做这一步的)。把他们的 final 属性去掉了,然后增加一些处理,例如根据 SystemProperties 直接去 data 分区加载自定义的 ttf 字体。
我这里做简单测试,就一种字体就只放了 Regular 的,然后扫描,就只认一个 ttf。然后贴下我改的代码,简单粗暴,当然这样换,肯定是换不全的:
1
2
3
4
5
6
7
8
9
10
11
12
13
14
15
16
17
18
19
20
21
22
23
24
25
26
27
28
29
30
31
32
33
34
35
36
37
38
39
40
41
42
43
44
45
46
47
48
49
50
51
52
53
54
55
56
57
58
59
60
61
62
63
64
65
66
67
68
69
70
71
72
73
74
75
76
77
78
79
static Typeface DEFAULT_INTERNAL;
static Typeface DEFAULT_BOLD_INTERNAL;
static Typeface SANS_SERIF_INTERNAL;
static Typeface SERIF_INTERNAL;
static Typeface MONOSPACE_INTERNAL;
public static void updateDefaultFont () {
setCustomFont();
}
static void setCustomFont() {
boolean useDefault = false ;
Typeface font = null ;
String fontPath = SystemProperties.get("persist.sys.customfont" , "default" );
if ("default" .equals(fontPath)) {
Slog.i(TAG, "use the default system font !!" );
font = DEFAULT_INTERNAL;
useDefault = true ;
} else {
try {
font = createFromFile(fontPath);
} catch (Exception e) {
e.printStackTrace() ;
Slog.e(TAG, "load custom font: " + fontPath + " failed !!" );
font = null ;
}
}
if (null != font) {
Slog.i("test" , "system: use the custom font: " + fontPath + " as system font. old-default=" + DEFAULT + ", new=" + font);
DEFAULT = font;
if (useDefault) {
DEFAULT_BOLD = DEFAULT_BOLD_INTERNAL;
SANS_SERIF = SANS_SERIF_INTERNAL;
SERIF = SERIF_INTERNAL;
MONOSPACE = MONOSPACE_INTERNAL;
} else {
DEFAULT_BOLD = font;
SANS_SERIF = font;
SERIF = font;
MONOSPACE = font;
}
sDefaults[0 ] = DEFAULT;
sDefaults[1 ] = DEFAULT_BOLD;
sDefaults[2 ] = DEFAULT;
sDefaults[3 ] = DEFAULT;
}
}
static {
DEFAULT = DEFAULT_INTERNAL = create((String) null , 0 );
DEFAULT_BOLD = DEFAULT_BOLD_INTERNAL = create((String) null , Typeface.BOLD);
SANS_SERIF = SANS_SERIF_INTERNAL = create("sans-serif" , 0 );
SERIF = SERIF_INTERNAL = create("serif" , 0 );
MONOSPACE = MONOSPACE_INTERNAL = create("monospace" , 0 );
sDefaults = new Typeface[] {
DEFAULT,
DEFAULT_BOLD,
create((String) null , Typeface.ITALIC),
create((String) null , Typeface.BOLD_ITALIC),
};
setCustomFont();
}
然后我在 Settings 里面简单加了一个测试用的换字体的界面,是长着这个样子的:
(图链接错了,然后原图不小心删掉了,懒得贴了,反正就是一个简单的 ListView)
这个代码就不贴了,很简单,一个 listview,底下2个 button,确定、取消。然稍微开个线程(懒的话,线程都不用开)去扫描 data 分区下我指定的那个放自定义字体的文件夹下的 ttf 文件,拿 ttf 文件的文件名来显示。然后选中把 ttf 的文件名在 SystemProperties 保存一下,如果 SystemProperties 没有就是默认的。
如果真的要在自己的产品里做的话,就要像我之前说的改 skia ,要把加载的默认字体换了,然后再把 java 层 Typeface 里面的默认字形给换了。我这里相当于是省略了 skia 那一步,只换 Typeface 里的字形而已。但是就是这个就有不少坑。下面来说说最大的一个坑,而且这个坑还是由于人家 android 的努力优化造成的。
这个坑是怎么回事呢。前面是不说要换 Typeface 的那几个 static 变量么。那首先把这几个变量的 final 属性去掉(其实这里就是坑了,人家原来这个 final 属性不是乱加的,后面就会知道)。然后看起前面我改的代码,Settings 那里自己写的界面,把 SystemProperties 改了,然后调用 Typeface 的 updateDefaultSysFont 会去重新加载设置的 ttf 文件,然后把那几个 static 变量换掉了。照理来说,还没启动的应用字体就应该换过来了(已经启动的,我还没加更新操作,先不管)。不过我发现好像不是这么回事,重新启动的应用还是原来系统的字体,我用 Settings forceStopPackage, shell 里面 kill -9 然后重启应用都没有。感觉很奇怪。但是重启后,就变过去了。刚开始我怀疑是没把 Typface 那几个 static 变量改过去,然后我里面加几个打印,发现是这样的:
这还真是没改过去。这是为什么。然后我在 Settings 那个设置字体的界面也加了点打印,发现就这个 Settings 的改变了,因为我是在 Settings 里调用的 Typface 的 updateDefaultSysFont 。后面我突然想到了一点,下面就来慢慢说。
前面说到了 Typeface 这几个 static 变量是在 static 语句的初始化的,就是每个进程这个 Typeface 类第一次实例化的时候就触发。android 用的是 dalvik(从 4.4 开始加入 art,L 开始 art 变成默认的虚拟机了)虚拟机。我们知道启动一个 java 程序是很慢的,没感觉的去 PC 启动个 java 程序看看就知道了。不光要启动进程,还要启动 dalvik 虚拟机,而且 android 上层 java 接口还有 N 个 class,系统还有一堆系统资源。如果重头开始加载的话,冷启动一个 android 程序是非常慢的(这里为什么说冷启动呢,因为 android 一旦启动了一个应用,为其开启了一个进程,退出应用后,这个进程不会马上销毁的,这样进程加载了的运行环境都还在,下次启动直接从应用的业务逻辑开始加载就新了,这个是不是有点像电脑的快速休眠、唤醒,这种我觉得可以叫热启动。那么相应的如果事先不存在这个应用的运行环境,重头开始启动就叫冷启动,相当于电脑开机)。
于是 android 就开始动脑筋开始优化了。首先 android 弄了一个叫 Zygote 的东西,这个是个 natvie 程序,开机由 init.rc 启动。init.rc 启动的二进制程序是 frameworks/cmds/app_process 这个(后面启动的时候好像是 set process name 改成 zygote 的):
service zygote /system/bin/app_process -Xzygote /system/bin --zygote --start-system-server
    class main
    socket zygote stream 660 root system
    onrestart write /sys/android_power/request_state wake
    onrestart write /sys/power/state on
    onrestart restart media
    onrestart restart netd
然后这个会调用 AppRuntime 的 start 方法,去启动 dalvik 虚拟机,然后去加载 java 中 zygote 相关的代码:
1
2
3
4
5
6
7
8
9
10
11
12
13
14
15
16
17
18
19
20
21
22
23
24
25
26
27
28
29
30
31
32
33
34
35
36
int main(int argc, const char * const argv[])
{
mArgC = argc;
mArgV = argv;
mArgLen = 0 ;
for (int i=0 ; i<argc; i++) {
mArgLen += strlen (argv[i]) + 1 ;
}
mArgLen--;
AppRuntime runtime;
const char * argv0 = argv[0 ];
... ...
if (zygote) {
runtime.start("com.android.internal.os.ZygoteInit" ,
startSystemServer ? "start-system-server" : "" );
} else if (className) {
runtime.mClassName = className;
runtime.mArgC = argc - i;
runtime.mArgV = argv + i;
runtime.start("com.android.internal.os.RuntimeInit" ,
application ? "application" : "tool" );
} else {
fprintf (stderr, "Error: no class name or --zygote supplied.\n" );
app_usage();
LOG_ALWAYS_FATAL("app_process: no class name or --zygote supplied." );
return 10 ;
}
}
这个 AppRuntime 继承自 AndroidRuntime ,这个在 frameworks/base/core/jni/AndroidRuntime.cpp 这里,然后这个 start 就会调用 startVM 去启动 dalvik 虚拟机加载 java 运行环境,然后调用 com.android.internal.os.ZygoteInit 这个类的 main 函数运行 java 代码了:
1
2
3
4
5
6
7
8
9
10
11
12
13
14
15
16
17
18
19
20
21
22
23
24
25
26
27
28
29
30
31
32
33
34
35
36
37
38
39
40
41
42
43
44
45
46
47
48
49
50
51
52
53
54
55
56
57
58
59
60
61
62
63
64
65
66
67
68
69
70
71
72
void AndroidRuntime::start(const char * className, const char * options)
{
... ...
JNIEnv* env;
if (startVm(&mJavaVM, &env) != 0 ) {
return ;
}
onVmCreated(env);
if (startReg(env) < 0 ) {
ALOGE("Unable to register all android natives\n" );
return ;
}
jclass stringClass;
jobjectArray strArray;
jstring classNameStr;
jstring optionsStr;
stringClass = env->FindClass("java/lang/String" );
assert(stringClass != NULL);
strArray = env->NewObjectArray(2 , stringClass, NULL);
assert(strArray != NULL);
classNameStr = env->NewStringUTF(className);
assert(classNameStr != NULL);
env->SetObjectArrayElement(strArray, 0 , classNameStr);
optionsStr = env->NewStringUTF(options);
env->SetObjectArrayElement(strArray, 1 , optionsStr);
char * slashClassName = toSlashClassName(className);
jclass startClass = env->FindClass(slashClassName);
if (startClass == NULL) {
ALOGE("JavaVM unable to locate class '%s'\n" , slashClassName);
} else {
jmethodID startMeth = env->GetStaticMethodID(startClass, "main" ,
"([Ljava/lang/String;)V" );
if (startMeth == NULL) {
ALOGE("JavaVM unable to find main() in '%s'\n" , className);
} else {
env->CallStaticVoidMethod(startClass, startMeth, strArray);
#if 0
if (env->ExceptionCheck())
threadExitUncaughtException(env);
#endif
}
}
free (slashClassName);
ALOGD("Shutting down VM\n" );
if (mJavaVM->DetachCurrentThread() != JNI_OK)
ALOGW("Warning: unable to detach main thread\n" );
if (mJavaVM->DestroyJavaVM() != 0 )
ALOGW("Warning: VM did not shut down cleanly\n" );
}
这里代码不想分析太多,挺复杂的,只是走走流程而已。然后就到 java 里面了,com.android.internal.os.ZygoteInit 的 main 函数:
1
2
3
4
5
6
7
8
9
10
11
12
13
14
15
16
17
18
19
20
21
22
23
24
25
26
27
28
29
30
31
32
33
34
35
36
37
38
39
40
41
42
43
44
45
46
47
48
public static void main (String argv[]) {
try {
SamplingProfilerIntegration.start();
registerZygoteSocket();
EventLog.writeEvent(LOG_BOOT_PROGRESS_PRELOAD_START,
SystemClock.uptimeMillis());
preload();
EventLog.writeEvent(LOG_BOOT_PROGRESS_PRELOAD_END,
SystemClock.uptimeMillis());
SamplingProfilerIntegration.writeZygoteSnapshot();
gc();
if (argv.length != 2 ) {
throw new RuntimeException(argv[0 ] + USAGE_STRING);
}
if (argv[1 ].equals("start-system-server" )) {
startSystemServer();
} else if (!argv[1 ].equals("" )) {
throw new RuntimeException(argv[0 ] + USAGE_STRING);
}
Log.i(TAG, "Accepting command socket connections" );
if (ZYGOTE_FORK_MODE) {
runForkMode();
} else {
runSelectLoopMode();
}
closeServerSocket();
} catch (MethodAndArgsCaller caller) {
caller.run();
} catch (RuntimeException ex) {
Log.e(TAG, "Zygote died with exception" , ex);
closeServerSocket();
throw ex;
}
}
注意那个 preload:
1
2
3
4
5
static void preload() {
preloadClasses();
preloadResources();
}
这里差不多该该说原理了。前面说了由于启动虚拟机很慢,而且还要 android 应用经常要使用系统提供的那一堆 java class 的接口和资源,这些东西第一加载也慢,第二其实每个应用这些东西都是一样的,如果每个应用一份,会浪费内存。
所以 android 就想了个办法,这个办法主要源自 linux(unix) 的 fork 机制。fork 是一个 linux 系统调用,能够在当前进程创建出一个子进程,子进程完全共享父进程的共有环境变量。好,有了这个基础就可以做一些优化了:
弄一个所有应用的共有父进程,专门用来 fork 子进程的,这个就是 zygote(孵化器这个名字取得真形象)。
由于子进程可以共享(继承)父进程的运行环境,所以可以把一些共用的东西在 zygote 中加载好,这样子进程一 fork 出来就有完整的运行环境,不需要重新加载。
由于子进程可以共享(继承)父进程的运行环境,基于 fork 的 copy-on-write 原则,只要这些变量不改变,那么子进程都不需要复制 zygote 进程的环境变量,共同一份,内存开销大大降低。
所以这个 zygote 在初始化的时候会有一个 preload 的预加载处理,其实这些资源,zygote 根本不用,是给它的子进程用的,这些子进程就是 android 的那些上层应用。这里我看看 preloadClasses 就是预先加载 sdk 中的那些 class(preloadResrouces 就不看先了,和这篇文章关系不大):
1
2
3
4
5
6
7
8
9
10
11
12
13
14
15
16
17
18
19
20
21
22
23
24
25
26
27
28
29
30
31
32
33
34
35
36
37
38
39
40
41
42
43
44
45
46
47
48
49
50
51
52
53
54
55
56
57
58
59
60
61
62
63
64
65
66
67
68
69
70
71
72
73
74
75
76
77
78
79
80
81
82
83
84
private static void preloadClasses () {
final VMRuntime runtime = VMRuntime.getRuntime();
InputStream is = ClassLoader.getSystemClassLoader().getResourceAsStream(
PRELOADED_CLASSES);
if (is == null ) {
Log.e(TAG, "Couldn't find " + PRELOADED_CLASSES + "." );
} else {
Log.i(TAG, "Preloading classes..." );
long startTime = SystemClock.uptimeMillis();
.... ...
try {
BufferedReader br
= new BufferedReader(new InputStreamReader(is), 256 *4 );
int count = 0 ;
String line;
while ((line = br.readLine()) != null ) {
line = line.trim();
if (line.startsWith("#" ) || line.equals("" )) {
continue ;
}
try {
if (false ) {
Log.v(TAG, "Preloading " + line + "..." );
}
Class.forName(line);
if (Debug.getGlobalAllocSize() > PRELOAD_GC_THRESHOLD) {
if (false ) {
Log.v(TAG,
" GC at " + Debug.getGlobalAllocSize());
}
System.gc();
runtime.runFinalizationSync();
Debug.resetGlobalAllocSize();
}
count++;
} catch (ClassNotFoundException e) {
Log.w(TAG, "Class not found for preloading: " + line);
} catch (Throwable t) {
Log.e(TAG, "Error preloading " + line + "." , t);
if (t instanceof Error) {
throw (Error) t;
}
if (t instanceof RuntimeException) {
throw (RuntimeException) t;
}
throw new RuntimeException(t);
}
}
System.gc();
runtime.runFinalizationSync();
Debug.resetGlobalAllocSize();
Log.i(TAG, "...preloaded " + count + " classes in "
+ (SystemClock.uptimeMillis()-startTime) + "ms." );
} catch (IOException e) {
Log.e(TAG, "Error reading " + PRELOADED_CLASSES + "." , e);
} finally {
IoUtils.closeQuietly(is);
runtime.setTargetHeapUtilization(defaultUtilization);
Debug.stopAllocCounting();
setEffectiveUser(ROOT_UID);
setEffectiveGroup(ROOT_GID);
}
}
}
它是会解析 frameworks-res.apk 中一个叫 preloaded-classes 的文件。这个文件在 frameworks/base 下面,会打包到 framework-res.apk 中去。这个文件和 ini 文件差不多,一行一个 class 路径。这个文件由 frameworks/base/tools/preload 这个个工具生成,会去检测 frameworks/base 下面的类,如果判断加载这个类超过 1250 微妙就会把这个类写入 preloaded-classes 中。当然这个文件是可以定制的。
preloadClasses 就是一行一行的解析这个文件,然后每次 Class.forName 就相当于 new 一个这个类的一个对象出来,就相当于加载这个类了。所以出触发这个类的一些 static 方法块。
我们在这个文件中发现有 Typeface。好,现在差不多就可以解释前面那个问题了。为什么我在 Settings 里,改了 Typeface 里的 static 变量会没用,即便是冷启动的应用都没有。那是因为通过 Settings 里面调用设置了 SystemProperties,就算是另外一个应用重新启动,但是由于这些应用都是通过 zygote fork 出来的,zygote 里面预先加载了 Typeface,跑了它的 static 代码块,它的那些 static 变量都已经设置好了。所以它 fork 出来的子进程,就算是新 fork 出来的,也不会再跑 Typeface 的那些 static 语句块,因为它继承了 zygote 预先加载好的 Typeface 的这些变量。所以 Typface 里面那几个 static 变量前面加的 final 不是乱加的,你要是乱改,就被坑了。
但是代码在咋手上,肯定还是有办法的。fork 的子进程会继承 zygote 的环境变量,那么只要把 zygote 里面的预先加载好的 Typeface 的环境变量更新一下就可以了。其实就是在 zygote 的进程里面调用下我在 Typeface 中新增的那个 updateDefaultSysFonts 就可以了。
好,现在要做的事,就是要更新 zygote 中的预先加载的 Typeface 的变量。这样就需要在 zygote 中加个接口。android 中 IPC 使用的 binder,但是也有非主流的,这里的 zygote 就是,zygote 用的是 socket 来通信的(同样的还有 vold)。
那就先看看它的协议,然后增加一条自己的就差不多。稍微来看下。前面 zygote 初始化那里,最后会跑到一个 runSelectLoopMode 的函数里:
1
2
3
4
5
6
7
8
9
10
11
12
13
14
15
16
17
18
19
20
21
22
23
24
25
26
27
28
29
30
31
32
33
34
35
36
37
38
39
40
41
42
43
44
45
46
47
48
49
50
51
52
53
54
55
56
57
58
59
60
61
62
private static void runSelectLoopMode() throws MethodAndArgsCaller {
ArrayList<FileDescriptor> fds = new ArrayList();
ArrayList<ZygoteConnection> peers = new ArrayList();
FileDescriptor[] fdArray = new FileDescriptor[4 ];
fds.add(sServerSocket.getFileDescriptor());
peers.add(null);
int loopCount = GC_LOOP_COUNT;
while (true ) {
int index;
if (loopCount <= 0 ) {
gc();
loopCount = GC_LOOP_COUNT;
} else {
loopCount--;
}
try {
fdArray = fds.toArray(fdArray);
index = selectReadable(fdArray);
} catch (IOException ex) {
throw new RuntimeException("Error in select()" , ex);
}
if (index < 0 ) {
throw new RuntimeException("Error in select()" );
} else if (index == 0 ) {
ZygoteConnection newPeer = acceptCommandPeer();
peers.add(newPeer);
fds.add(newPeer.getFileDesciptor());
} else {
boolean done;
done = peers.get(index).runOnce();
if (done) {
peers.remove(index);
fds.remove(index);
}
}
}
}
这个是一个循环,这个才是典型的 service 结构么,这里 java 层的,android 又把 socket 封装了一下,这里不深究了,主要下面,当有一个连接请求过来的话,这个处理被封装成 ZygoteConnection 了,然后里面的 runOnce 函数。瞄了一下发现 zygote 这个 socket 通信的协议基本说可以没有(代码不贴了,这篇文章不是分析这个为主的)。就是 client 把几个命名,按一行一行的写入,然后 zygote 这边一行一行的读取,解析。而且这个命令主要就只有一个,就是启动新的进程,然后主要是一些参数多一点而已。
为此 zygote 弄了一个类 Arguments ,里面有不少变量,主要是它支持的参数多。哦,那就好办了,咋随便选一个,然后发一个特殊的参数过去当成我们的接口就 OK 了。
我这里选了 classpath 和 niceName,classpath 发一个特殊的字符串,我这里发 “#Lights#3Moon” 这个串,代表是我自己加的接口,路径这个都是非法的,所以不会和正常的通信起冲突,然后 niceName 就是我自己要的命令,例如现在加一个 “updatefont” 代表更新字体变量:
1
2
3
4
5
6
7
static final String ZYGOTE_MAGIC_COMMAND = "#Lights#3Moon" ;
static final String ZYGOTE_COMMAND_UPDATE_FONT = "updateFont" ;
然后就琢磨了下 parseArgs ,然后发命令的格式就是:
1
2
3
4
5
6
7
8
9
10
11
12
13
14
15
16
17
18
19
20
21
22
23
public void updateConfigurationForChangeSysFont () {
synchronized (this ) {
try {
ArrayList<String> argsForZygote = new ArrayList<String>();
argsForZygote.add("-classpath" );
argsForZygote.add(ZYGOTE_MAGIC_COMMAND);
argsForZygote.add("--nice-name=" + ZYGOTE_COMMAND_UPDATE_FONT);
Process.zygoteSendArgsAndGetResult(argsForZygote);
} catch (Exception e) {
e.printStackTrace();
}
killProcessForUpdateSysFontLocked();
}
}
Process 直接就有接口,直接利用现成的就行了。然后 ZygoteConnection 的 runOnce 稍微改改,增加下我们的 magic command 的相应就行了:
1
2
3
4
5
6
7
8
9
10
11
12
13
14
15
16
17
18
19
20
21
22
23
24
25
26
27
28
29
30
31
32
33
34
35
36
37
38
39
40
41
42
43
44
45
46
47
48
49
50
51
52
53
54
55
56
57
58
59
60
61
62
63
64
65
66
67
68
69
70
71
72
73
74
75
76
77
78
79
80
81
82
83
84
85
86
87
88
89
90
91
92
93
94
95
96
97
98
99
100
101
102
boolean runOnce() throws ZygoteInit.MethodAndArgsCaller {
String args[];
Arguments parsedArgs = null ;
FileDescriptor[] descriptors;
... ...
boolean isMagicCommand = false ;
try {
parsedArgs = new Arguments(args);
if (ZYGOTE_MAGIC_COMMAND.equals(parsedArgs.classpath)) {
isMagicCommand = true ;
}
applyUidSecurityPolicy(parsedArgs, peer);
applyRlimitSecurityPolicy(parsedArgs, peer);
applyCapabilitiesSecurityPolicy(parsedArgs, peer);
applyInvokeWithSecurityPolicy(parsedArgs, peer);
applyDebuggerSystemProperty(parsedArgs);
applyInvokeWithSystemProperty(parsedArgs);
int [][] rlimits = null ;
if (parsedArgs.rlimits != null ) {
rlimits = parsedArgs.rlimits.toArray(intArray2d);
}
if (parsedArgs.runtimeInit && parsedArgs.invokeWith != null ) {
FileDescriptor[] pipeFds = Libcore.os.pipe();
childPipeFd = pipeFds[1 ];
serverPipeFd = pipeFds[0 ];
ZygoteInit.setCloseOnExec(serverPipeFd, true );
}
if (isMagicCommand) {
pid = 9999 ;
execMagicCommand(parsedArgs);
} else {
pid = Zygote.forkAndSpecialize(parsedArgs.uid, parsedArgs.gid,
parsedArgs.gids, parsedArgs.debugFlags, rlimits);
}
} catch (IOException ex) {
logAndPrintError(newStderr, "Exception creating pipe" , ex);
} catch (ErrnoException ex) {
logAndPrintError(newStderr, "Exception creating pipe" , ex);
} catch (IllegalArgumentException ex) {
logAndPrintError(newStderr, "Invalid zygote arguments" , ex);
} catch (ZygoteSecurityException ex) {
logAndPrintError(newStderr,
"Zygote security policy prevents request: " , ex);
}
try {
if (pid == 0 ) {
IoUtils.closeQuietly(serverPipeFd);
serverPipeFd = null ;
handleChildProc(parsedArgs, descriptors, childPipeFd, newStderr);
return true ;
} else {
IoUtils.closeQuietly(childPipeFd);
childPipeFd = null ;
if (isMagicCommand) {
return handleParentProcInMagicCommand(pid, descriptors, parsedArgs);
} else {
return handleParentProc(pid, descriptors, serverPipeFd, parsedArgs);
}
}
} finally {
IoUtils.closeQuietly(childPipeFd);
IoUtils.closeQuietly(serverPipeFd);
}
}
然后就是我自己加的那几个函数:
1
2
3
4
5
6
7
8
9
10
11
12
13
14
15
16
17
18
19
20
21
22
23
24
25
26
27
28
29
30
31
32
33
34
35
36
37
38
39
40
41
42
43
44
45
46
47
48
49
50
51
52
53
54
55
56
private void execMagicCommand (Arguments parsedArgs) {
String cmds = parsedArgs.niceName;
if (null == cmds) {
Log.i(TAG, "the magic command is null, ignore it !!" );
return ;
}
if (ZYGOTE_COMMAND_UPDATE_FONT.equals(cmds)) {
Log.i(TAG, "exec zygote magic command: " + cmds);
Typeface.updateDefaultFont();
} else {
Log.i(TAG, "the magic command: " + cmds + " is unknow, ignore it !!" );
}
}
private boolean handleParentProcInMagicCommand (int pid,
FileDescriptor[] descriptors, Arguments parsedArgs) {
if (descriptors != null ) {
for (FileDescriptor fd: descriptors) {
IoUtils.closeQuietly(fd);
}
}
boolean usingWrapper = false ;
try {
mSocketOutStream.writeInt(pid);
mSocketOutStream.writeBoolean(usingWrapper);
} catch (IOException ex) {
Log.e(TAG, "Error reading from command socket" , ex);
return true ;
}
if (parsedArgs.peerWait) {
try {
mSocket.close();
} catch (IOException ex) {
Log.e(TAG, "Zygote: error closing sockets" , ex);
}
return true ;
}
return false ;
}
这样 zygote 就改造完成了,试了下果然有效果。但是现在只是 zygote 更新后,新 fork 的子进程有效,原来 fork 出来的还是没改变。这个就是下面要说,更新之前的应用的字体。
2. 更新应用
这个咧,一开始我觉得我可以参考下 Settings 里面切换语言,因为这个和切换字体感觉挺像的。这个主要是调到了 AM 里面的 updateConfigurationLocked 这个函数。这个函数的参数如下:
切换语言的时候发送 Settings 调用的参数是: updateConfigurationLocked(newConfig, null, false, false). Configuration 中有几个变量是和语言相关的:
1
2
3
4
5
6
7
8
9
10
11
12
13
14
public Locale locale;
public boolean userSetLocale;
第一个是表示当前的语言(En、zh-rCN 等),后面那个是表示用户是否设置了语言。这个函数的第一参数是表示当前更改的语言(包含在 Configuration 中)。然后看了下这个函数的实现:
1
2
3
4
5
6
7
8
9
10
11
12
13
14
15
16
17
18
19
20
21
22
23
24
25
26
27
28
29
30
31
32
33
34
35
36
37
38
39
40
41
42
43
44
45
46
47
48
49
50
51
52
53
54
55
56
57
58
59
60
61
62
63
64
65
66
67
68
69
70
71
72
73
74
75
76
77
78
79
80
81
82
83
84
85
86
87
88
89
90
91
92
93
94
95
96
97
98
99
100
101
102
103
104
105
boolean updateConfigurationLocked(Configuration values,
ActivityRecord starting, boolean persistent, boolean initLocale) {
if (mHeadless) return true ;
int changes = 0 ;
boolean kept = true ;
if (values != null ) {
Configuration newConfig = new Configuration(mConfiguration);
changes = newConfig.updateFrom(values);
if (changes != 0 ) {
if (DEBUG_SWITCH || DEBUG_CONFIGURATION) {
Slog.i(TAG, "Updating configuration to: " + values);
}
EventLog.writeEvent(EventLogTags.CONFIGURATION_CHANGED, changes);
if (values.locale != null && !initLocale) {
saveLocaleLocked(values.locale,
!values.locale.equals(mConfiguration.locale),
values.userSetLocale);
}
mConfigurationSeq++;
if (mConfigurationSeq <= 0 ) {
mConfigurationSeq = 1 ;
}
newConfig.seq = mConfigurationSeq;
mConfiguration = newConfig;
Slog.i(TAG, "Config changed: " + newConfig);
final Configuration configCopy = new Configuration(mConfiguration);
mShowDialogs = shouldShowDialogs(newConfig);
AttributeCache ac = AttributeCache.instance();
if (ac != null ) {
ac.updateConfiguration(configCopy);
}
mSystemThread.applyConfigurationToResources(configCopy);
if (persistent && Settings.System.hasInterestingConfigurationChanges(changes)) {
Message msg = mHandler.obtainMessage(UPDATE_CONFIGURATION_MSG);
msg.obj = new Configuration(configCopy);
mHandler.sendMessage(msg);
}
for (int i=mLruProcesses.size()-1 ; i>=0 ; i--) {
ProcessRecord app = mLruProcesses.get(i);
try {
if (app.thread != null ) {
if (DEBUG_CONFIGURATION) Slog.v(TAG, "Sending to proc "
+ app.processName + " new config " + mConfiguration);
app.thread.scheduleConfigurationChanged(configCopy);
}
} catch (Exception e) {
}
}
Intent intent = new Intent(Intent.ACTION_CONFIGURATION_CHANGED);
intent.addFlags(Intent.FLAG_RECEIVER_REGISTERED_ONLY
| Intent.FLAG_RECEIVER_REPLACE_PENDING);
broadcastIntentLocked(null , null , intent, null , null , 0 , null , null ,
null , false , false , MY_PID, Process.SYSTEM_UID, 0 );
if ((changes&ActivityInfo.CONFIG_LOCALE) != 0 ) {
broadcastIntentLocked(null , null ,
new Intent(Intent.ACTION_LOCALE_CHANGED),
null , null , 0 , null , null ,
null , false , false , MY_PID, Process.SYSTEM_UID, 0 );
}
}
}
if (changes != 0 && starting == null ) {
starting = mMainStack.topRunningActivityLocked(null );
}
if (starting != null ) {
kept = mMainStack.ensureActivityConfigurationLocked(starting, changes);
mMainStack.ensureActivitiesVisibleLocked(starting, changes);
}
if (values != null && mWindowManager != null ) {
mWindowManager.setNewConfiguration(mConfiguration);
}
return kept;
}
看样子先是对比下传过来的 config 和现在正在使用的相比看看有没有变化,有的话通过 mLruProcesses 对最近使用过的进程的主线程(UI 线程)发送新的配置,让其重新加载资源。然后后面那个 starting 如果不为 null 的话,估计会根据配置变化情况是否重新启动吧,最后然 WM 也根据新配置做下调整。
如果是这里换字体想利用这个去更新界面的话,我尝试传递在这个函数增加一个参数,标志是我更新字体专用的。这个时候我就取当前的 config 作为更改的配置,然后故意在里面把 changes 改了一下:
1
2
3
4
5
6
if (updateForChangeSysFont) {
newConfig.userSetLocale = true ;
changes |= ActivityInfo.CONFIG_LOCALE;
}
后面发现,确实走了下面,但是发现界面并没有更新,后面跟了下代码,发现后面很多函数还会判断你传过去的 config 使用的 local 是不是和当前的一样的 -_-|| 。看样子没那么容易忽悠 android 啊。
后面我又想到了一个简单、暴力的办法,把进程直接 kill 掉,但是保留任务记录,然后让它们自己重新启动就好了。AM 里面有个方法可以直接 kill 进程,但是不清除任务记录:
public boolean killPids(int[] pids, String pReason, boolean secure)
这个和 forceStopPackage 不一样,只会把进程杀掉而已,而且能一次性杀很多个。看了下实现后,发现这个接口应该是系统内存不足的时候要调整内存用的,其中里面可以看得到进程的类型,以及被杀的优先级。这个里面会选传递过去那一组 pids 中进程优先级最低的开始杀,所以不太符合我们的需求,我就访问它的实现自己改了一个出来:
1
2
3
4
5
6
7
8
9
10
11
12
13
14
15
16
17
18
19
20
21
22
private void killProcessForUpdateSysFontLocked () {
int worstType = ProcessList.FOREGROUND_APP_ADJ - 1 ;
String reason = "update sys font" ;
Slog.w(TAG, "Killing processes for reason: " + reason + ", adj=" + worstType);
for (ProcessRecord app : mLruProcesses) {
ProcessRecord proc = mPidsSelfLocked.get(app.pid);
if (proc == null ) {
continue ;
}
int adj = proc.setAdj;
Slog.w(TAG, "try to Killing " + proc + " (adj " + adj + "): " + reason + ", killedBackground=" + proc.killedBackground);
if (adj >= worstType && !proc.killedBackground) {
Slog.w(TAG, "Killing " + proc + " (adj " + adj + "): " + reason);
EventLog.writeEvent(EventLogTags.AM_KILL, proc.pid,
proc.processName, adj, reason);
proc.killedBackground = true ;
Process.killProcessQuiet(app.pid);
}
}
}
(我的调用这个函数的地方有 synchronized 锁的,前面的代码可以看得到,所以里面就没加锁了)。这里稍微贴一下 ProcessList 的调整等级:
1
2
3
4
5
6
7
8
9
10
11
12
13
14
15
16
17
18
19
20
21
22
23
24
25
26
27
28
29
30
31
32
33
34
35
36
37
38
static final int HOME_APP_ADJ = 6 ;
static final int SERVICE_ADJ = 5 ;
static final int BACKUP_APP_ADJ = 4 ;
static final int HEAVY_WEIGHT_APP_ADJ = 3 ;
static final int PERCEPTIBLE_APP_ADJ = 2 ;
static final int VISIBLE_APP_ADJ = 1 ;
static final int FOREGROUND_APP_ADJ = 0 ;
static final int PERSISTENT_PROC_ADJ = -12 ;
static final int SYSTEM_ADJ = -16 ;
这里没贴完的,剩余自己去看吧。按照原来的实现,数值越大的进程,就越是容易被杀掉。至于那2个负数的等级,自己看注释吧,-12 那个应该是代表通话的进程,还有 system ui 这些。-16 那个不要想了,那个 zygote 和 system_server 都在里面的,杀掉直接系统重启了。
所以我选了 FOREGROUND_APP_ADJ - 1。这个调用之后,几乎可以杀掉你能“看到”的所有进程,但是 system ui 杀不掉。所以 system ui 的字体没更新。这个的话,当然可以考虑使用 -12 ,但是真的是要项目上用的话,效果很不好,因为其他应用挂了,黑屏一下,还可以曲线救国一下:可以考虑在 system_server 搞个界面做字体选择,挡住原来那些应用,就看不到黑屏了。 但 system ui 一挂,无论如何你都会看到状态栏、虚拟按键突然没了,然后再出来,体验太不好了。
所以可以考虑继续使用我一开始说的那个方法,但是得继续研究下,例如在 Configuration 中加个字段,表示换字体强制更新界面,然后发给 system ui,然后 system ui 那里再处理下这个字段。或者是不是所有的应用都可以用这种方式更新,而不用杀掉它们。反正这个我目前还没研究了,但是要能用的话,至少 system ui 不能杀掉的,想偷点懒的话就结合杀进程一起用吧(system ui 更新,其他的杀)。
这里只是记录下大致思路,以及一些已经验证了的想法。后面真要做这个功能这里的东西还是有一定参考价值的,以后用到再说啦。