起源
前几天市场反馈说,我们的平板上用浏览器在百度搜索的时候某些页面会有乱码现象:

我们的平板的字库文件是被我们自己扩展过的。因为我们的应用需要显示一些特殊的符号(不在 unicode 编码里面),所以我们系统中的 ttf 字体是被我们扩展了很多东西进去。找到相关人员问了下,当初做字体的时候很多,塞了很多可能不需要的东西进去。晕,把字体文件换成 android 原来的(我们改的是 DroidSansFallback.ttf,替换 /system/fonts 下面的就可以了),果然就不乱码了。
既然是塞进了很多不用的,那初步想法是:在字库文件中找到这个字模,把它干掉就行了。
找出乱码网页编码
要先找到乱码字体的字模,首先得知道这个乱码是个什么字体。这个是个百度搜索的网页。在 PC 上用 chrome 的话,可以右键查看网页源码,看到传送过来的字符数据。但是发现 PC 上百度搜索和平板的页面不一样。PC 上这样的:

后面问我们这搞网络相关的同时,平板上发送的 http 请求的 user agent 不一样,百度服务器识别出这是移动平台的,所以发送过来的页面就不一样。然后要通过抓包得到平板上的浏览器发送的 user agent。
在 android 上可以使用 tcpdump 来抓包,这个是个开源的东西,不过我懒得自己编了(要交叉编译,烦),随笔百度一下就有现成的了(arm 的): 下载地址 。
下载好后, push 到 /system/bin 下面。注意要使用这个东西,机器要有 root 权限。然后运行这个程序:
./tcpdump -i any -p -s 0 -w /mnt/sdcard/capture.pcap
这东西的参数啥的自己去官网查: tcpdump.org。 运行之后,就开浏览器,然后开百度搜索,等结果出来了,在 adb shell 里面 ctrl+c 终止,就能停止抓包了。
然后把抓包文件 capture.pcap pull 出来。在 PC 用 wireshark 来查看。 wireshark 在 ubuntu 可以直接用 apt-get install 安装,window 去官网下载就行了。用 wireshark 看到 user agent:
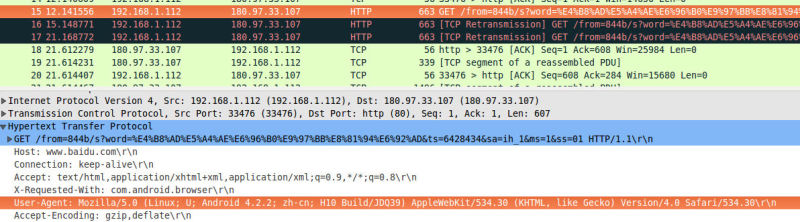
可以看得到 user agent 是: “Mozilla/5.0 (Linux; U; Android 4.2.2; zh-cn; H10 Build/JDQ39) AppleWebKit/534.30 (KHTML, like Gecko) Version/4.0 Safari/534.30\r\n”
然后可以写一个程序,用 webview 模拟这个请求,去加载乱码的页面,然后通过开启 JavaScript 运行本地调用,把网页的源代码导出成 html 文件。直接上代码吧:
1 2 3 4 5 6 7 8 9 10 11 12 13 14 15 16 17 18 19 20 21 22 23 24 25 26 27 28 29 30 31 32 33 34 35 36 37 38 39 40 41 42 43 44 45 46 47 48 49 50 51 52 53 54 55 56 57 58 59 60 61 62 63 64 65 66 67 68 69 70 71 72 73 74 75 76 77 78 79 80 81 82 83 84 85 86 87 88 89 90 91 92 93 94 95 96 97 98 99 100 101 102 103 104 105 106 107 108 109 110 111 112 113 114 115 116 117 118 119 120 121 122 123 124 125 126 127 128 129 130 131 132 133 134 135
| private final static String URL_1 = "http://www.baidu.com/from=844b/s?word=%E4%B8%AD%E5%A4%AE%E6%96%B0%E9%97%BB%E8%81%94%E6%92%AD&ts=3758057&sa=ib&ms=1"; private Button mBtnUrl1 = null; private WebView mWebView = null; final class InJavaScriptLocalObj { public void showSource(String html) { Log.d("HTML", html); saveHtmlToFile(html, "/mnt/sdcard/dump/" + System.currentTimeMillis() + ".html"); } } final class MyWebViewClient extends WebViewClient { @Override public boolean shouldOverrideUrlLoading(WebView view, String url) { view.loadUrl(url); return true; } @Override public void onPageStarted(WebView view, String url, Bitmap favicon) { Log.d(TAG,"onPageStarted"); } @Override public void onPageFinished(WebView view, String url) { Log.d(TAG,"onPageFinished "); view.loadUrl("javascript:window.local_obj.showSource('<head>'+" + "document.getElementsByTagName('html')[0].innerHTML+'</head>');"); } } @Override protected void onCreate(Bundle savedInstanceState) { super.onCreate(savedInstanceState); requestWindowFeature(Window.FEATURE_NO_TITLE); setContentView(R.layout.activity_dump_html); mBtnUrl1 = (Button) findViewById(R.id.btn_url_1); mWebView = (WebView) findViewById(R.id.wv_src); WebSettings settings = mWebView.getSettings(); settings.setUserAgentString("Mozilla/5.0 (Linux; U; Android 4.2.2; zh-cn; H10 Build/JDQ39) AppleWebKit/534.30 (KHTML, like Gecko) Version/4.0 Safari/534.30\r\n"); settings.setJavaScriptEnabled(true); mWebView.addJavascriptInterface(new InJavaScriptLocalObj(), "local_obj"); mWebView.setWebViewClient(new MyWebViewClient()); mBtnUrl1.setOnClickListener(this); } @Override public void onClick(View view) { if (view.equals(mBtnUrl1)) { setUrl(URL_1); } } private void setUrl(String url) { mWebView.loadUrl(url); } private static String getParentDir(String path) { if (null == path) { return null; } try { int last = path.lastIndexOf("/"); if (last <= -1) { return null; } return path.substring(0, last); } catch (Exception e) { Log.e(TAG, e.toString()); return null; } } private static boolean checkFileDirExists(String fileName) { String dir = getParentDir(fileName); if (null == dir) { return false; } File fDir = new File(dir); try { if (!fDir.exists()) { if (!fDir.mkdirs()) { Log.e(TAG, "create folder " + dir + " failed"); } } return true; } catch (SecurityException e) { Log.e(TAG, "create folder " + dir + " failed: " + e.toString()); return false; } } private static void saveHtmlToFile(String html, String fileName) { if (!checkFileDirExists(fileName)) { Log.d(TAG, "save html file error: create dir failed !!"); return; } try { FileOutputStream fos = new FileOutputStream(fileName); fos.write(html.getBytes()); fos.flush(); fos.close(); Log.d(TAG, "save " + fileName + " sucess !"); } catch (Exception e) { e.printStackTrace(); } }
|
上面开启 JavaScript 支持的话,在 manifest 的 target SDK 生成 level 16 以下。当然如果也有办法高于 16,具体方法见这里: android addJavascriptInterface 不能生效 解决办法。
然后就能得到乱码页码的 html 源码了。拿 UE 打开,通过搜索 “完整版”(那个乱码页码数据的关键字),可以看到乱码那一排的标题的数据了(注意打开 UE 的自动换行功能,很好用):

哎, UE 里面显示好像每一个字符后面有个什么东西,换成16进制看一下:
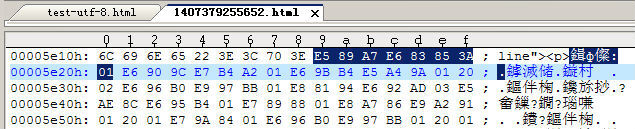
可以看得到果然有一个奇怪的字符在这个乱码的标题中 01,前面的 “E5 89 A7”、“E6 83 85”、“3A” 分别是 “剧”、“情”、“:” 的 utf-8 编码数据。从 html 的头可以看到这个页面是 utf-8 编码的:

utf-8 的编码知识看看可以参看这2篇笔记:
[转] unicode 编码表
[转] 字符编码笔记
这样看来 0x01 在 unicode 里面是和 ASCII 码一样的(前 128 个字符和 ACSII 兼容),但是 0x01 是不可打印的字符(可以打印的从 0x20 开始)。我用 FontCreatorPro 打开 android 默认的 DroidSansFallback.ttf 看了下 0x01 是没有字模的,也就是说应该渲染不出来的,不知道在我们的字库里面怎么就映射到一个字模上了。这个要看 webkit 怎么解析的了,不过我对 webkit 又不怎么熟。
想到 android 的 2D 失量库是 skia,在字体渲染那里应该可以能看得到字体的编码信息,这样就能值的 webkit 最终渲染的字体是什么了。
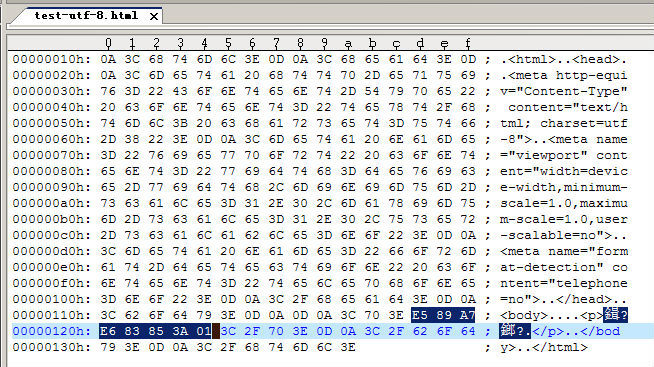
这样的话就要尽量减少 webkit 渲染的数量,数量一多打印就看不过来了。所以从刚刚的乱码的 html 中提取乱码的那一段做成一个测试用的 html,然后 webview 加载这个 html 就行了。构造的 html 如下:
1 2 3 4 5 6 7 8 9 10 11 12 13
| <!doctype html> <html> <head> <meta http-equiv="Content-Type" content="text/html; charset=utf-8"> <meta name="viewport" content="width=device-width,minimum-scale=1.0,maximum-scale=1.0,user-scalable=no"> <meta name="format-detection" content="telephone=no"> </head> <body> <p>剧情:┎</p> </body> </html>
|
`
注意“剧情:”这里的要用 UE 的16进制编辑把 utf-8 编码写进去:
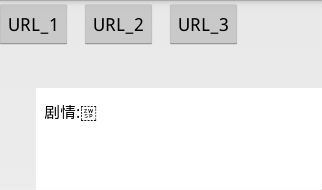
然后 mWebView.loadUrl(“file:///android_asset/test-utf-8.html”); 就可以了(test-utf-8.html 放到 assets 下面),记得在之前把 webview 设成 utf-8 编码模式: mWebView.getSettings().setDefaultTextEncodingName(“utf-8”); 。跑一下,果然可以了。
找到乱码的字模
上层 Canvas.java(frameworks/base/graphics/java/android/graphics/Canvas.java) 的 drawText 是调用 jni 的 Canvas.cpp(frameworks/base/core/jni/android/graphics/Canvas.cpp) 里面的函数:
1 2 3 4 5 6 7 8 9 10 11 12 13 14
| public void drawText(String text, float x, float y, Paint paint) { native_drawText(mNativeCanvas, text, 0, text.length(), x, y, paint.mBidiFlags, paint.mNativePaint); }
|
Canvas.cpp 则是调用 skia 里面的:
1 2 3 4 5 6 7 8 9 10 11 12 13 14 15 16 17 18 19 20 21 22 23 24 25 26 27 28 29 30 31 32 33 34 35 36 37 38 39 40 41
| static void drawText__StringIIFFIPaint(JNIEnv* env, jobject, SkCanvas* canvas, jstring text, int start, int end, jfloat x, jfloat y, int flags, SkPaint* paint) { const jchar* textArray = env->GetStringChars(text, NULL); drawTextWithGlyphs(canvas, textArray, start, end, x, y, flags, paint); env->ReleaseStringChars(text, textArray); } static void drawTextWithGlyphs(SkCanvas* canvas, const jchar* textArray, int start, int count, int contextCount, jfloat x, jfloat y, int flags, SkPaint* paint) { sp<TextLayoutValue> value = TextLayoutEngine::getInstance().getValue(paint, textArray, start, count, contextCount, flags); if (value == NULL) { return; } SkPaint::Align align = paint->getTextAlign(); if (align == SkPaint::kCenter_Align) { x -= 0.5 * value->getTotalAdvance(); } else if (align == SkPaint::kRight_Align) { x -= value->getTotalAdvance(); } paint->setTextAlign(SkPaint::kLeft_Align); doDrawGlyphsPos(canvas, value->getGlyphs(), value->getPos(), 0, value->getGlyphsCount(), x, y, flags, paint); doDrawTextDecorations(canvas, x, y, value->getTotalAdvance(), paint); paint->setTextAlign(align); } static void doDrawGlyphsPos(SkCanvas* canvas, const jchar* glyphArray, const jfloat* posArray, int index, int count, jfloat x, jfloat y, int flags, SkPaint* paint) { SkPoint* posPtr = new SkPoint[count]; for (int indx = 0; indx < count; indx++) { posPtr[indx].fX = SkFloatToScalar(x + posArray[indx * 2]); posPtr[indx].fY = SkFloatToScalar(y + posArray[indx * 2 + 1]); } canvas->drawPosText(glyphArray, count << 1, posPtr, *paint); delete[] posPtr; }
|
看到最后是调用了 Skia 的 SkCanvas 来渲染字体的,其实从这里可以看得到 java 层的 canvas 相关的东西(包括 Bitmap)全是 skia 的马甲 jni 调用。skia 在 external/skia 下面,编译出来是一个 so (libskia.so 在 /system/lib 下面)。
SkCanvas.cpp(skia/src/core/SkCanvas.cpp)
1 2 3 4 5 6 7 8 9 10 11 12 13
| void SkCanvas::drawPosText(const void* text, size_t byteLength, const SkPoint pos[], const SkPaint& paint) { LOOPER_BEGIN(paint, SkDrawFilter::kText_Type) while (iter.next()) { SkDeviceFilteredPaint dfp(iter.fDevice, looper.paint()); iter.fDevice->drawPosText(iter, text, byteLength, &pos->fX, 0, 2, dfp.paint()); } LOOPER_END }
|
通过搜索发现, drawPosText 应该是 SkDraw.cpp(skia/src/core/SkDraw.cpp) 里面的实现的:
1 2 3 4 5 6 7 8 9 10 11 12 13 14 15 16 17 18 19 20 21 22 23 24 25 26 27 28 29 30 31 32 33 34 35 36 37 38 39 40 41 42 43 44 45 46 47 48 49 50 51 52 53 54 55 56 57 58 59 60 61 62 63 64 65 66 67 68 69 70 71 72 73 74 75 76 77 78 79 80 81 82 83 84 85 86 87 88 89 90 91 92 93 94 95 96 97 98 99 100 101 102 103 104 105 106 107 108 109 110 111 112 113 114 115 116 117 118 119 120 121 122 123 124 125 126 127 128 129 130 131 132 133 134 135 136 137 138 139 140 141 142 143 144 145 146 147 148 149 150 151 152 153 154 155 156 157 158 159 160 161 162 163 164 165 166 167 168 169 170 171 172 173 174 175 176 177
| #include <utils/CallStack.h> #include <cutils/log.h> #define LOG_TAG "Skia" static char g_strDebugTmp[32] = {0}; static char g_strDebugBuff[512] = {0}; void SkDraw::drawPosText(const char text[], size_t byteLength, const SkScalar pos[], SkScalar constY, int scalarsPerPosition, const SkPaint& paint) const { memset(g_strDebugTmp, 0x00, strlen(g_strDebugTmp)); memset(g_strDebugBuff, 0x00, strlen(g_strDebugBuff)); int i = 0; for (i = 0; i < byteLength; i++) { sprintf(g_strDebugTmp, "%02x, ", text[i]); strcat(g_strDebugBuff, g_strDebugTmp); } ALOGD("SkDraw::drawPosText text: %s, len=%d", g_strDebugBuff, byteLength); SkASSERT(byteLength == 0 || text != NULL); SkASSERT(1 == scalarsPerPosition || 2 == scalarsPerPosition); SkDEBUGCODE(this->validate();) if (text == NULL || byteLength == 0 || fRC->isEmpty()) { return; } if ( (fMatrix->hasPerspective())) { return; } const SkMatrix* matrix = fMatrix; if (hasCustomD1GProc(*this)) { if (fMVMatrix) { matrix = fMVMatrix; } } SkDrawCacheProc glyphCacheProc = paint.getDrawCacheProc(); SkAutoGlyphCache autoCache(paint, matrix); SkGlyphCache* cache = autoCache.getCache(); SkAAClipBlitterWrapper wrapper; SkAutoBlitterChoose blitterChooser; SkBlitter* blitter = NULL; if (needsRasterTextBlit(*this)) { blitterChooser.choose(*fBitmap, *matrix, paint); blitter = blitterChooser.get(); if (fRC->isAA()) { wrapper.init(*fRC, blitter); blitter = wrapper.getBlitter(); } } const char* stop = text + byteLength; AlignProc alignProc = pick_align_proc(paint.getTextAlign()); SkDraw1Glyph d1g; SkDraw1Glyph::Proc proc = d1g.init(this, blitter, cache); TextMapState tms(*matrix, constY); TextMapState::Proc tmsProc = tms.pickProc(scalarsPerPosition); if (cache->isSubpixel()) { SkAxisAlignment roundBaseline = SkComputeAxisAlignmentForHText(*matrix); if (SkPaint::kLeft_Align == paint.getTextAlign()) { while (text < stop) { tmsProc(tms, pos); #ifdef SK_DRAW_POS_TEXT_IGNORE_SUBPIXEL_LEFT_ALIGN_FIX SkFixed fx = SkScalarToFixed(tms.fLoc.fX); SkFixed fy = SkScalarToFixed(tms.fLoc.fY); #else SkFixed fx = SkScalarToFixed(tms.fLoc.fX) + (SK_FixedHalf >> SkGlyph::kSubBits); SkFixed fy = SkScalarToFixed(tms.fLoc.fY) + (SK_FixedHalf >> SkGlyph::kSubBits); #endif SkFixed fxMask = ~0; SkFixed fyMask = ~0; if (kX_SkAxisAlignment == roundBaseline) { fyMask = 0; } else if (kY_SkAxisAlignment == roundBaseline) { fxMask = 0; } const SkGlyph& glyph = glyphCacheProc(cache, &text, fx & fxMask, fy & fyMask); if (glyph.fWidth) { proc(d1g, fx, fy, glyph); } pos += scalarsPerPosition; } } else { while (text < stop) { const char* currentText = text; const SkGlyph* glyph = &glyphCacheProc(cache, &text, 0, 0); if (glyph->fWidth) { SkDEBUGCODE(SkFixed prevAdvX = glyph->fAdvanceX;) SkDEBUGCODE(SkFixed prevAdvY = glyph->fAdvanceY;) SkFixed fx, fy; SkFixed fxMask = ~0; SkFixed fyMask = ~0; tmsProc(tms, pos); { SkIPoint fixedLoc; alignProc(tms.fLoc, *glyph, &fixedLoc); fx = fixedLoc.fX + (SK_FixedHalf >> SkGlyph::kSubBits); fy = fixedLoc.fY + (SK_FixedHalf >> SkGlyph::kSubBits); if (kX_SkAxisAlignment == roundBaseline) { fyMask = 0; } else if (kY_SkAxisAlignment == roundBaseline) { fxMask = 0; } } glyph = &glyphCacheProc(cache, ¤tText, fx & fxMask, fy & fyMask); SkASSERT(prevAdvX == glyph->fAdvanceX); SkASSERT(prevAdvY == glyph->fAdvanceY); proc(d1g, fx, fy, *glyph); } pos += scalarsPerPosition; } } } else { while (text < stop) { const SkGlyph& glyph = glyphCacheProc(cache, &text, 0, 0); if (glyph.fWidth) { tmsProc(tms, pos); SkIPoint fixedLoc; alignProc(tms.fLoc, glyph, &fixedLoc); proc(d1g, fixedLoc.fX + SK_FixedHalf, fixedLoc.fY + SK_FixedHalf, glyph); } pos += scalarsPerPosition; } } }
|
再跟进去看下取的是哪个字模函数。 SkPaint.cpp(skia/src/core/SkPaint.cpp):
1 2 3 4 5 6 7 8 9 10 11 12 13 14 15 16 17 18 19 20 21 22 23 24 25
| SkDrawCacheProc SkPaint::getDrawCacheProc() const { static const SkDrawCacheProc gDrawCacheProcs[] = { sk_getMetrics_utf8_00, sk_getMetrics_utf16_00, sk_getMetrics_glyph_00, sk_getMetrics_utf8_xy, sk_getMetrics_utf16_xy, sk_getMetrics_glyph_xy }; unsigned index = this->getTextEncoding(); if (fFlags & kSubpixelText_Flag) { index += 3; } ALOGD("SkPaint::getDrawCacheProc textEncode: %d", index); SkASSERT(index < SK_ARRAY_COUNT(gDrawCacheProcs)); return gDrawCacheProcs[index]; }
|
通过打印可以看得到:
D/Skia    (  446): SkDraw::drawPosText text: 1b, 00, 1d, 00, 17, 00, 16, 00, , len=8
D/Skia    (  446): SkPaint::getDrawCacheProc textEncode: 2

D/Skia    ( 1231): SkDraw::drawPosText text: 4c, 52, aa, 60, 1d, 00, f0, 1f, , len=8
D/Skia    ( 1231): SkPaint::getDrawCacheProc textEncode: 5
上面的打印是其它地方 UI 渲染字体的打印,下面是测试乱码 url webkit 渲染字体的打印,其它地方用的获取字模的函数是 sk_getMetrics_glyph_00, webkit 那用的是 sk_getMetrics_glyph_xy。在这2个函数再加点打印。跟踪发现这2个函数调用的是 SkGlyphCache.cpp(skia/src/core/SkGlyphCache.cpp)的 getGlyphIDMetrics :
1 2 3 4 5 6 7 8 9 10 11 12 13 14 15 16 17 18 19 20 21 22 23 24 25 26 27 28 29 30 31 32 33 34 35 36 37 38 39 40 41 42 43 44 45 46 47 48 49 50 51
| const SkGlyph& SkGlyphCache::getGlyphIDMetrics(uint16_t glyphID) { VALIDATE(); uint32_t id = SkGlyph::MakeID(glyphID); unsigned index = ID2HashIndex(id); SkGlyph* glyph = fGlyphHash[index]; ALOGD("SkGlyphCache::getGlyphIDMetrics glyphID: %04x(%d), id=%d, index=%d", glyphID, glyphID, id, index); if (NULL == glyph || glyph->fID != id) { RecordHashCollisionIf(glyph != NULL); glyph = this->lookupMetrics(glyphID, kFull_MetricsType); fGlyphHash[index] = glyph; } else { RecordHashSuccess(); if (glyph->isJustAdvance()) { fScalerContext->getMetrics(glyph); } } SkASSERT(glyph->isFullMetrics()); return *glyph; } const SkGlyph& SkGlyphCache::getGlyphIDMetrics(uint16_t glyphID, SkFixed x, SkFixed y) { VALIDATE(); uint32_t id = SkGlyph::MakeID(glyphID, x, y); unsigned index = ID2HashIndex(id); SkGlyph* glyph = fGlyphHash[index]; ALOGD("SkGlyphCache::getGlyphIDMetricsXY glyphID: %04x(%d) - (%d,%d), id=%d, index=%d", glyphID, glyphID, x, y, id, index); if (NULL == glyph || glyph->fID != id) { RecordHashCollisionIf(glyph != NULL); glyph = this->lookupMetrics(id, kFull_MetricsType); fGlyphHash[index] = glyph; } else { RecordHashSuccess(); if (glyph->isJustAdvance()) { fScalerContext->getMetrics(glyph); } } SkASSERT(glyph->isFullMetrics()); return *glyph; }
|
再来看下打印:
D/Skia    (  446): SkDraw::drawPosText text: 1b, 00, 1d, 00, 18, 00, 13, 00, , len=8
D/Skia    (  446): SkPaint::getDrawCacheProc textEncode: 2
D/Skia    (  446): SkGlyphCache::getGlyphIDMetrics glyphID: 001b(27), id=27, index=27
D/Skia    (  446): SkGlyphCache::getGlyphIDMetrics glyphID: 001d(29), id=29, index=29
D/Skia    (  446): SkGlyphCache::getGlyphIDMetrics glyphID: 0018(24), id=24, index=24
D/Skia    (  446): SkGlyphCache::getGlyphIDMetrics glyphID: 0013(19), id=19, index=19
这个 001b、001d、0018、0013 应该就是渲染的字体的字模信息,但是还不确定是 unicode 的编码还是别的什么。先来猜一下,0x001b,如果是 UCS-2 的话,那么应该是 ASCII 的不可打印字符,所以应该不是,那肯能就会字库里字模的索引,用 font creator 看一下,发现我们改过的字库里,0x001b 的索引是个空的,用 android 原来的字库看一下,发现是 “8” 的字模,然后 0x001d、0x0018、0x0013 分别是: “:”、”5”、”0”
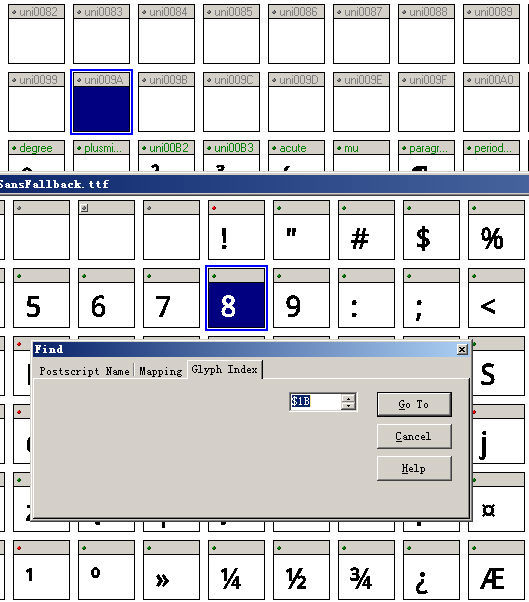
连在一起就是 “8:50”,哎,这个好像是状态栏上显示的时间的文本:

然后这个东西,还经常在打印,拿出来一看,果然是和当前显示的时间对上的。所以 textEncode 为 2 的 sk_getMetrics_glyph_00 中的数据是字模的索引号。那么来看下我要找的乱码的那个字符串的字模索引是多少:
既然之前我是用 android 原来的字体推测出来的,那这里继续先用 android 原来的字体。跑我之前写的测试 url 小程序,发现打印如下:
D/Skia    ( 1228): SkDraw::drawPosText text: c5, 0b, 23, 1a, 1d, 00, bc, cb, , len=8
D/Skia    ( 1228): SkPaint::getDrawCacheProc textEncode: 5
D/Skia    ( 1228): SkGlyphCache::getGlyphIDMetricsXY glyphID: 0bc5(3013) - (532480,0), id=3013, index=3013
D/Skia    ( 1228): SkGlyphCache::getGlyphIDMetricsXY glyphID: 1a23(6691) - (1581056,0), id=6691, index=2595
D/Skia    ( 1228): SkGlyphCache::getGlyphIDMetricsXY glyphID: 001d(29) - (2629632,0), id=29, index=29
D/Skia    ( 1228): SkGlyphCache::getGlyphIDMetricsXY glyphID: cbbc(52156) - (2912256,0), id=67161020, index=4028
这里文本是:“剧”、“情”、“:” 和一个不知道是什么字符的东西。首先第三个 “:” 的索引 0x001d 和上面的的一样。然后 “剧” 的如果按照索引来找,字模好像不对,用 UCS-2 编码去查 “剧” 发现, “剧” 其实在离索引找出来的字模不远的地方,“情” 也是一样的,后来我一算发现 索引号-0x65 就是了:
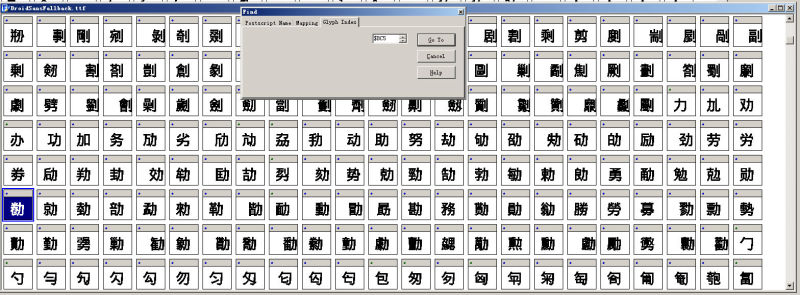
然后最后那个 cbbc 在 android 原来的字库中根本就每这个索引(超过字库范围了),看样子 webkit 是把那个 0x01 转化为一个根本不可能渲染出来的字体来处理的。
好,先在换我们改过的字库来看一下,打印如下:
D/Skia    ( 1231): SkDraw::drawPosText text: 4c, 52, aa, 60, 1d, 00, f0, 1f, , len=8
D/Skia    ( 1231): SkPaint::getDrawCacheProc textEncode: 5
D/Skia    ( 1231): SkGlyphCache::getGlyphIDMetricsXY glyphID: 524c(21068) - (532480,0), id=21068, index=588
D/Skia    ( 1231): SkGlyphCache::getGlyphIDMetricsXY glyphID: 60aa(24746) - (1581056,0), id=24746, index=170
D/Skia    ( 1231): SkGlyphCache::getGlyphIDMetricsXY glyphID: 001d(29) - (2629632,0), id=29, index=29
D/Skia    ( 1231): SkGlyphCache::getGlyphIDMetricsXY glyphID: 1ff0(8176) - (2912256,0), id=67117040, index=3056
0x524c - 0x65 = 0x51e7 ,一找,还真是 “剧” 的字模,看样子猜对了。
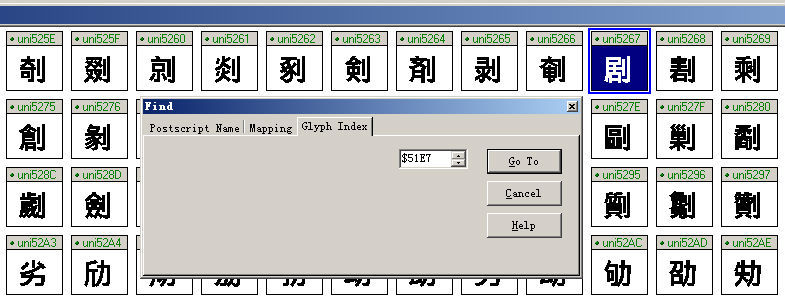
textEncode 为 5 的 sk_getMetrics_glyph_xy 的文本数据也是字模的索引,但是有一定的偏移,这里的偏移是 0x65,可能不同的字库偏移不一样吧。然后最终找到那个乱码的字模了: 0x1ff0 - 0x65 = 0x1f8B :
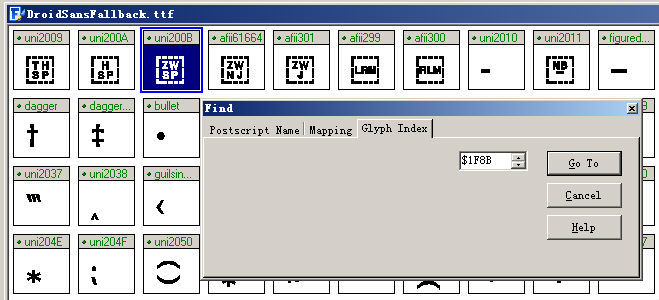
看样子我们的字库里面塞了太多东西,webkit 本来想转为一个不存在的字模的,但是在我们这就能渲染出来了。用 font creator 把这个字模的数据删掉(右键—>属性,然后 crtl+a,delete 就行了),就显示不出来了。